How To Communicate with a Test-Set or Relay
Sometimes the hardest part of relay testing is getting your laptop to talk to the relay or test-set. There are two primary communication methods:
Serial Connections

Serial communication is the most common path between devices because it came first. Luckily for you, the industry has pretty much standardized on DB-9 serial connection and cables. (Back in the day, we had to carry a bunch of adapters. We also had to cross our fingers every time we made a connection because some pins were inexplicably hot and would fry your computer ![]() )
)
Most devices communicate information between the wires connected to pins two and three.
There are two kinds of serial connections:
Straight-Through Connections
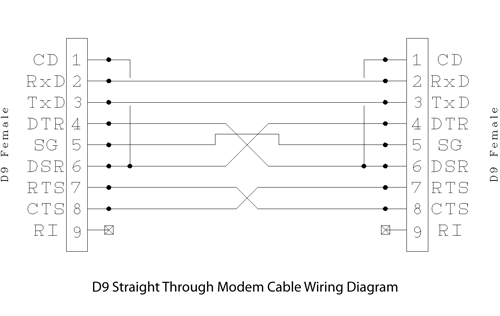
Pin two on one side of the cable is connected to pin two on the other side of the cable. Pin three is connected to the same wire on both sides of the cable. You will need a straight-through cable to communicate with:
- Most GE/Multilin relays.
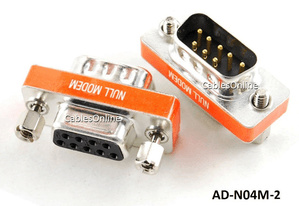
Null-Modem Connections
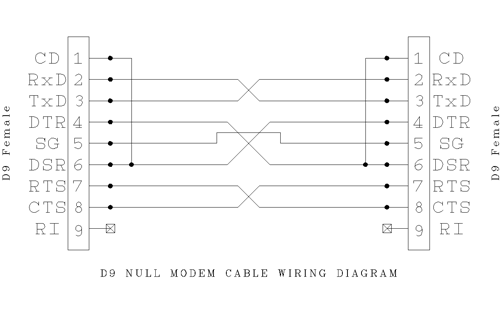
Pins two and three are crossed as shown in the following diagram.
You will typically need a null-modem connection when connecting between:
- SEL relays
- Beckwith Electric Relays
- Siemens Relays
USB/Serial
![By oomlout (ADEX-02-US (USB Cable)) [CC BY-SA 2.0 (http://creativecommons.org/licenses/by-sa/2.0)], via Wikimedia Commons](https://relaytraining.com/wp-content/uploads/2016/10/04-USB_Serial_Cable.png)
Some manufacturers have serial connections that use a USB cable. You will need to contact the manufacturer to see if their cable is proprietary or not.
What You Need to Communicate to Test-Sets and Relays Via a Serial Connection
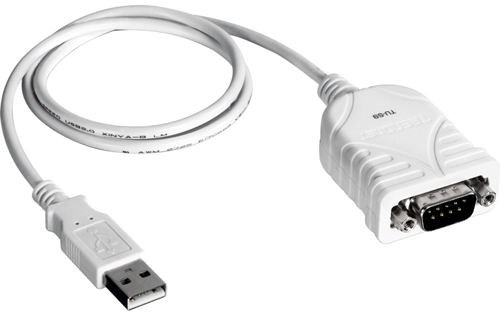
Almost no computer manufacturers have serial ports nowadays, so you will probably need to buy a USB-to-serial adapter. The guys at Intellirent recommended this one to me. They say this one works most often. (You can click on the product pictures below to purchase any recommendation on amazon. We do not get any compensation for anything you buy via these links)
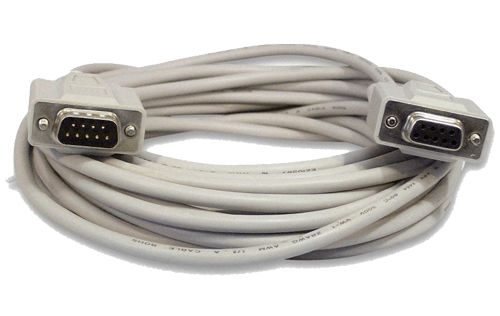
You will also need a cable to connect between the USB-to-Serial converter and the device. I use a 25’ cable like the one shown below so that I can connect to any device in a 25’ radius.
A lot of my students are happy with their Bluetooth serial adapters if you wanted to try the wireless route.
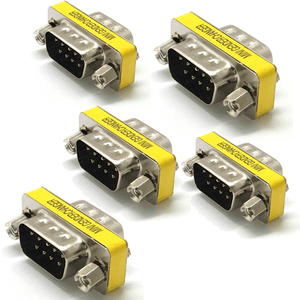
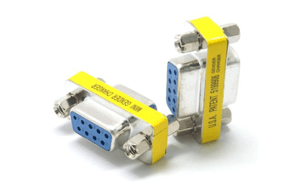
The cable above is a straight-through cable, so I will have problems communicating with a device that requires a null-modem connection. I use the following null-modem adapters that internally cross pins two and three so that I can switch back and forth between straight-through and null modem connections at will.
I also carry some gender benders in case I come a across a non-standard connection.
How to Communicate to Relays and Test-Sets with a Serial Connection
Step 1 – Make the Connection
Make a physical connection between your computer and the device you want to communicate with using the parts described above.
Troubleshooting step 1: If you can’t communicate with the device, check to make sure you have a physical connection. I can’t tell you how many students get frustrated when the communication doesn’t work; and then find out that they forgot to plug both ends in.
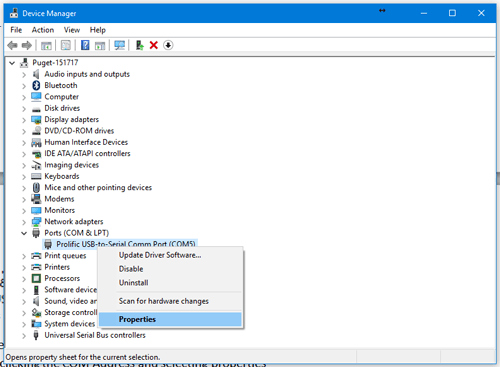
Step 2 – Get The COM Address
Once you’ve inserted the USB-to-serial adapter to your computer, your computer will assign a COM Address. You need to know this address. If you plug the same converter into the same USB port, the COM Address will be the same every time; so pick the most convenient USB port and keep using that port every time you want to make a serial connection.
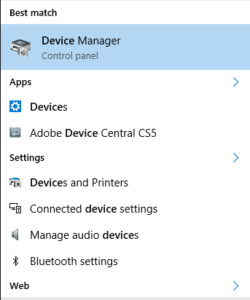
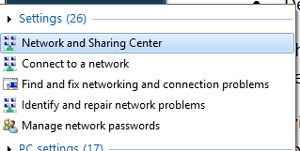
You can find the COM Address using the “Device Manager” in windows. Notice that I did NOT say Devices and Printers. You want “Device Manager” and you can get there many ways:
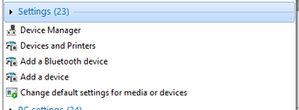
Click Start 
![]() and start typing “device manager”. You should see a link under settings like this one in Windows™ 10
and start typing “device manager”. You should see a link under settings like this one in Windows™ 10
or this one in Windows™ 7.
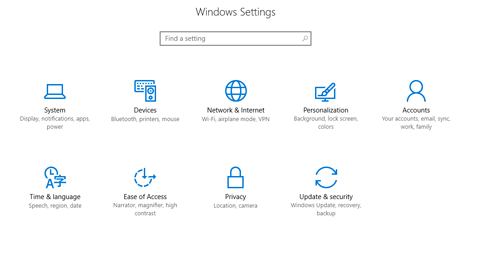
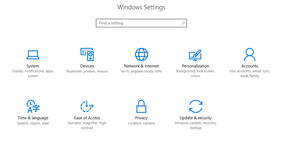
You can also go to PC Settings/Devices/Device Manager in Windows™ 10
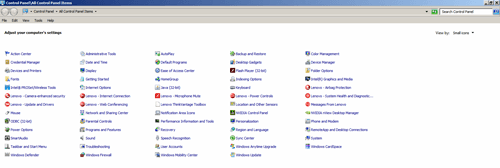
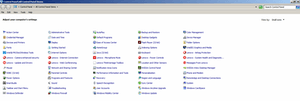
or Control Panel/Device Manager in Windows™ 7.
Then click the little triangle next to Ports (COM & LPT)
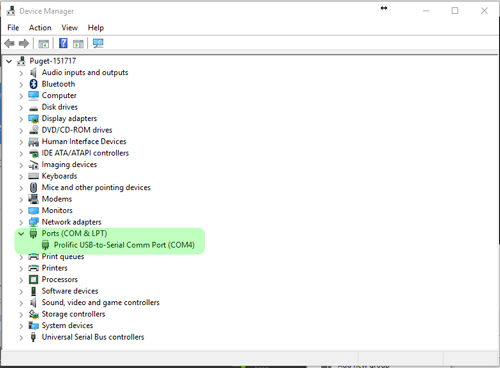
Your device should have a description with the words USB-to-Serial and a COM port assignment. Mine is COM4.
If I move to another USB port, it will change to another COM Address. Now it is COM.5

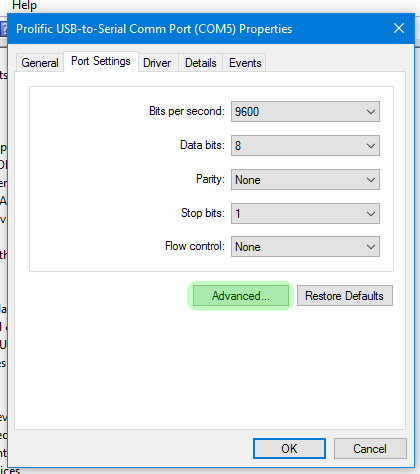
Some relay software won’t connect with COM Addresses greater than nine. You can change the address to another by right-clicking the COM Address and selecting “Properties.”
Click “Port Settings” and ignore everything except the “Advanced…” button and click it.
Change the COM Address with the “COM Port Number” pull down list.
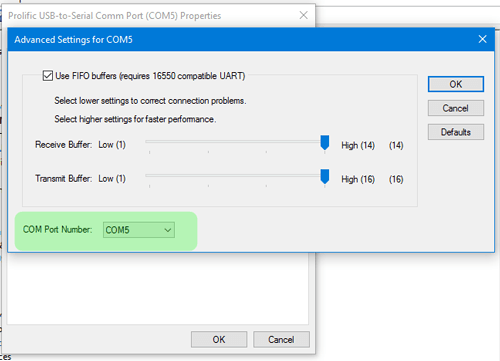
Occasionally Windows™ will show that the first 10 COM ports are in use. That’s likely a bug. Choose any address other than “COM1” and you should be fine”
Serial communication can happen at different speeds called Baud Rates. Your computer and the end device need to have the same Baud Rate, otherwise they are tuned to different channels and be unable to talk to each other. You can usually find out the Baud Rate for the communication port you are connected to via the front panel. Make sure your software has the same Baud Rate. (Remember the change has to happen in the device software, not in the Device Manager menu we just looked at.)
Now that you know the COM Address, open your relay or test-set software and follw the instructions below:
How to Connect with SEL AcSELerator® QuickSet
Open the software and click the “Communications/Parameters…” menu.
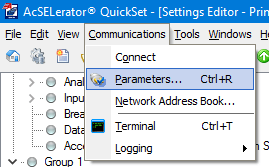
Select Active Connection Type “Serial” in the top pull-down list and then select your COM Address in the “Device” Pull Down menu
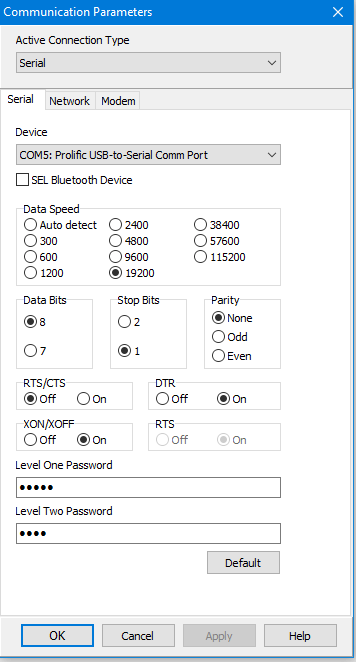
Find out what the Data Speed is for the port you are connected to via the relay’s front panel. “SET/PORT/Show” and set the Data Speed to match.
The rest of the settings should be default. Click “OK”.
The TXD and RXD lights in the bottom left-hand side of the program should start flashing right away. If they don’t, you probably need to go back to the beginning.

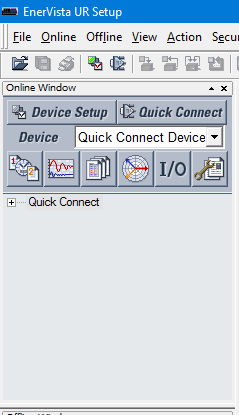
How to Connect with GE/Multilin Software
All the modern GE/Multilin software is essentially the same. Start by opening the program and click the “Quick Connect” button near the top left-hand side.
Choose the “Serial” Interface, The correct COM Address in “COM Port”, and default “Baud Rate” (Unless you know the correct Baud rate, then use that. You could look it up from the front panel, but it usually isn’t worth the time.)
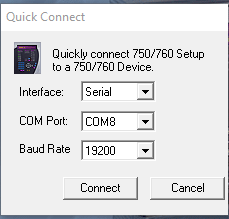
Click “Connect”. If everything is OK, it will tell you. If it can’t communicate, try the other Baud rate. If it still can’t connect, make sure you are using a straight-through cable and go back to the beginning.
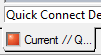
Even if the software does state that you have a connection, periodically check the bottom tab of an open window and make sure the light is green, and not red like it’s shown below. Green means you have a connection, red means it is using archived information in the display.
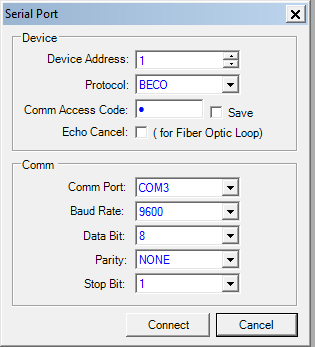
How to Connect with Beckwith Electric Software
Open the software and Click Connect/Serial Port
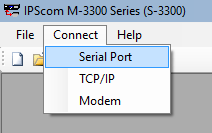
Match Your COM Address to the “Comm Port” setting. All the other settings should be default. Click “Connect”.
Ethernet Communication
Ethernet, or TCP/IP, communication is the preferred method of contact in the modern age. You can transfer more information in less time because the pipe is bigger, and information theoretically can’t be lost during communication; unlike a serial connection.
Your computer thinks it is connecting to the internet when you make an Ethernet connection. The internet is full of bad players who want to control of, or get information from, your computer; so your I.T. department probably has some safeguards installed to protect your computer, and potentially make your job miserable. If you think everything should work and it isn’t, try turning off the following to see if they are the problem.
- Your VPN
- Any other connection to the internet
- Your antivirus/firewall software
There are three ways that you can use to connect via Ethernet, or TCP/IP:
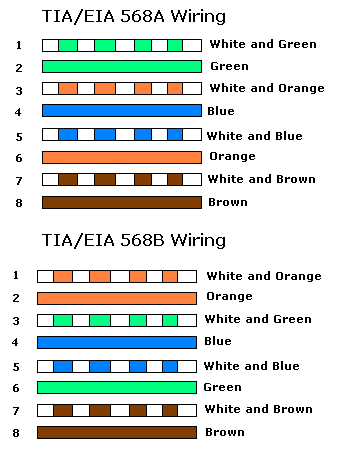
1. A straight Ethernet cable where the pins and wire colors are the same on both ends. This is the most common cable to use and is the one you can buy in any electronics store.
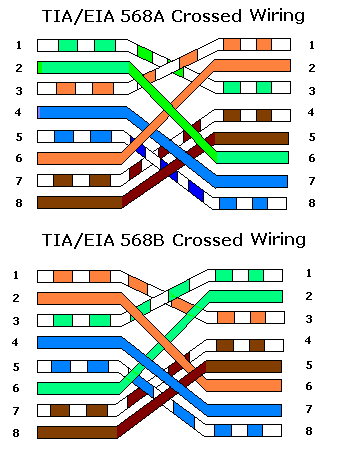
2. A crossed Ethernet cable where the following pins are crossed. This is often called a Hub-to-Hub cable and you probably won’t find it in a normal consumer electronics store.
3. A wireless Ethernet connection.
Be aware that some computers have auto-switching Ethernet cards that will detect whether the connections needs to be straight or crossed and adjust accordingly. This means that a cable that works with one computer may not work with another that does not auto-switch.
Configure Your Laptop for Ethernet TCP/IP Communication
The setup on your laptop for all three methods is the same if the TCP\IP address must match. These steps are typically unnecessary with Omicron Test Universe.
Step 1: Connect the Two Devices
Make a connection [physical cable(s), or connect to the wireless network] between your computer and the device you want to talk to. Your computer will ask the network for an address. If you are connected to a real network, an address will probably be applied automatically. However, if you are making a direct connection between your computer and a device, it is extremely unlikely that the device will have the technology (DHCP Server) to tell your computer what address to be. Your computer will wait a few minutes, and if no address is provided it will:
- Default to a predefined address set by your IT department
- Default to an Alternate Configuration address in the Ethernet Adapter settings
- Default to the last used address
None of these are likely to be the address you need to talk to your relay or test-set. The first rule of Ethernet connections is “The devices must have similar, but not identical, addresses to communicate.
Some devices (Like Manta MTS-5x00s) will allow you to change their addresses to match your computer, but you will have to change your computer to match the device most of the time.
Step 2: Change your Computer’s Ethernet Adapter Settings
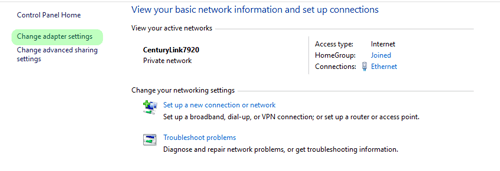
Press the Start button and start typing “Network and Sharing Center” and select it from the list.
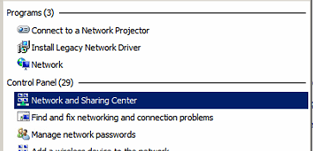
Or go to Network and Sharing Center through “Settings” (Windows™ 10) or “Control Panel” (Windows™ 7)
Then select “Change Adapter Settings” on the left-hand side
Choose the network adapter you are using to connect (Usually called Ethernet 1). If you’re not sure which one it is, unplug the cable and look for the adapter to show “Not Connected”, then plug it in again. It should change to some version of connected.
Right-click that adapter and select “Properties”
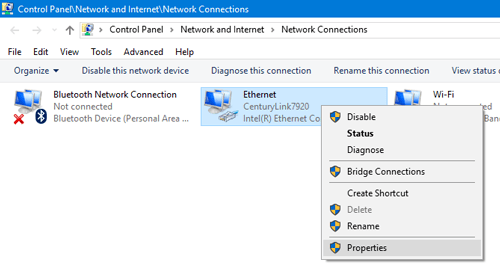
Select “Internet Protocol Version 4 (TCP/IPv4)” and click “Properties”
Now you have two choices.
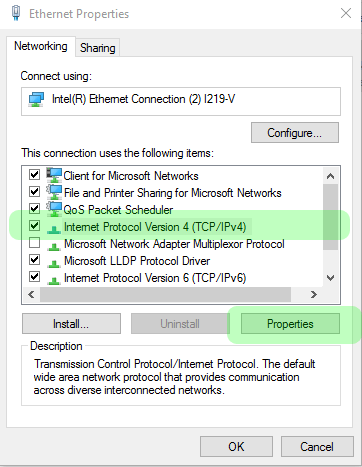
General Settings
If you want it to work 95% of the time, stay in the general tab and select “Use the following IP Address”
Find out what address the device is using from the relay or test-set front panel. (see below) Make sure that the first three IP address numbers are identical. For example, if my test-set address is 192.168.0.250, then the first three numbers are correct in the image above because they perfectly match the device. This is like telling your computer that it is in country 192, state 168, and city 0 so that it can be close to your device.

The last number MUST BE DIFFERENT. The two devices cannot have the same IP address because that would mean that there would be two identical addresses in the same city. The information would not know whether it should go to your computer or the device. It doesn’t matter what the last number is as long as it is different than the device number, and is less than 255. The device I want to talk to is 192.168.0.250, so I will set my computer to 192.168.0.2(anything but 250).
Click the subnet mask and a number will be automatically created.
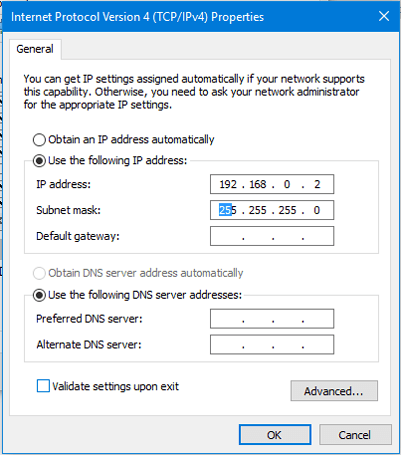
The rest of the numbers only matter if you want to connect to the internet. We typically don’t care about the internet, so click “OK”.
You should be able to connect to the device with the appropriate software (see below) by setting the correct IP Address in the software. If it doesn’t work, try these troubleshooting steps.
How to Troubleshoot Ethernet Communication
Ethernet Troubleshooting step #1:
Are there little LEDs around the Ethernet port on your computer or the device. If so, are they turning on and off. If they are, there is a physical connection between the two devices. If not, either something is wrong with your cable or the Ethernet ports on either device.
Ethernet Troubleshooting step #2:
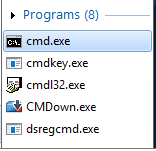
Now that we know you have a physical connection, let’s see if your computer is setup properly. Press the Start button, type “cmd”, and open “cmd.exe” to open the command prompt. You can also try looking for something called “Command Prompt” in Windows™ Accessories.
A window should open that looks something like this:
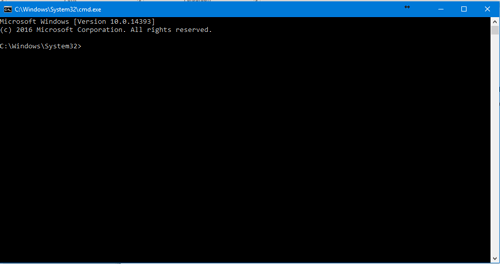
First we want to see if your setting changes actually were applied. Some particularly nasty IT departments can block changes like the ones described previously. Type “ipconfig” [Enter] and look for your Ethernet adapter settings. If you can’t find the settings, try “ipconfig /all”

My Ethernet settings look like they were accepted because my IPv4 Address is 192.168.0.2.
Ethernet Troubleshooting step #3:
Now we want to see whether you CAN talk to the device. Type “ping” followed by the IP Address of the device you are trying to communicate with. (192.168.0.250 in my case)
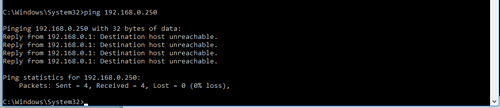
You can see that the destination was unreachable. There is something wrong with the connection or the addressing. In this case the device is off. I’ll turn it on and try again. I had to do it twice because I didn’t wait long enough for it to boot up.
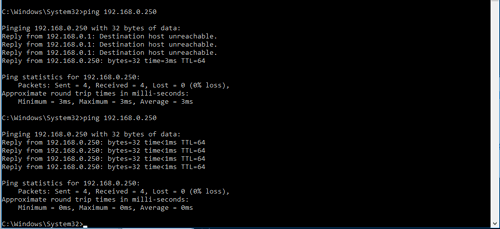
The last test shows the amount of time it took for the two devices to send communication back and forth. We now know that the addressing and connection is OK. But it still might not work in the native software because of something wrong with that software, or how your IT department has your computer configured.
Ethernet Troubleshooting step #4:
Open your software and try again. If it doesn’t work:
- Disable your VPN and try again.
- Still nothing? Turn off, or disable, all other Ethernet adapters and try again.
- Still nothing? Disable your firewall/antivirus software and try again.
- Still nothing? Reboot your computer, disable your firewall, turn off or disable all other Ethernet adapters, disable your firewall/anti-virus software and try again.
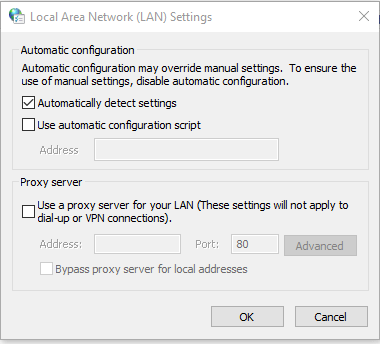
- Still nothing? Press Start, type “Internet Options”, and open Internet Options.
Go to the “Connections” Tab and click “LAN Settings”
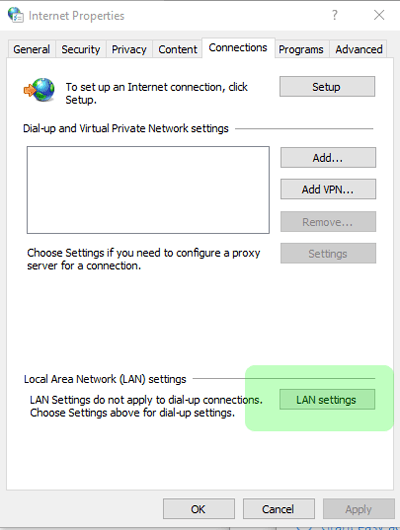
If there is anything in “Use Automatic configuration script” or “Proxy Server”, contact your IT department and ask them what to do.
Still nothing? Call the device vendor.
Communicate with the Relay or Test-Set
How to Connect with SEL AcSELerator® QuickSet
Open the software and open the “Communications/Parameters…” menu.
Select “Network” from the “Active Connection Type” menu. Enter the device address in the Host IP address.
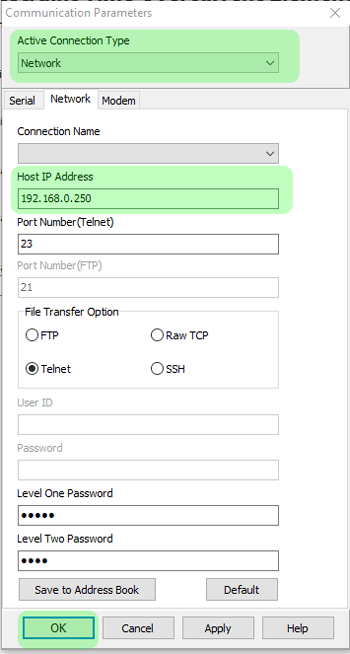
Click “OK”
How to Connect with GE/Multilin Software
Open the software
Click Quick Connect
Select the “Ethernet” “Interface”
Enter the “IP Address” of the device you want to communicate with
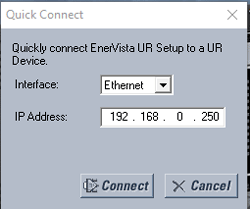
Click “Connect”
How to Connect with Beckwith Electric Software
Open the software and Click “Connect”/”TCP/IP”
Give the device a “Name”
Enter the “IP Address”
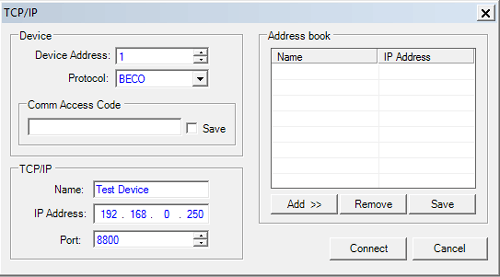
4. Click “Connect”
How to Connect with Omicron Test Universe to CMC-xxx
It shouldn’t be necessary to play with your computer or Omicron settings, which is nice. However, you have to associate your test-set to the software before you can start testing.
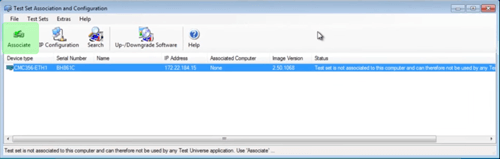
Open Test Universe
Click “Test Set Association” from the “Setup” Menu on the right-hand side of the screen
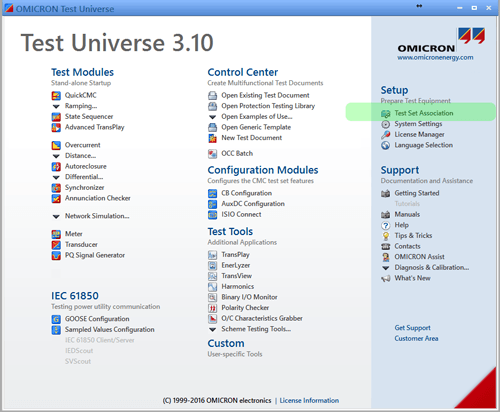
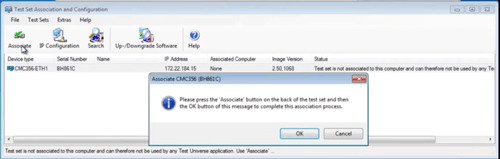
If you see your test-set in the list, click “Associate” in the toolbar
Press the “Associate” button on the back of the CMC
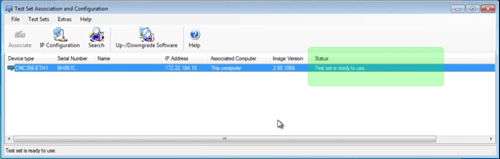
The screen should state “Test set is ready to use” beside your test-set
How to Connect to Manta MTS-5xxx Protective Relay Test Systems
Make the connection between your computer and the Manta with a crossed Ethernet cable like the one that came with the test-set.
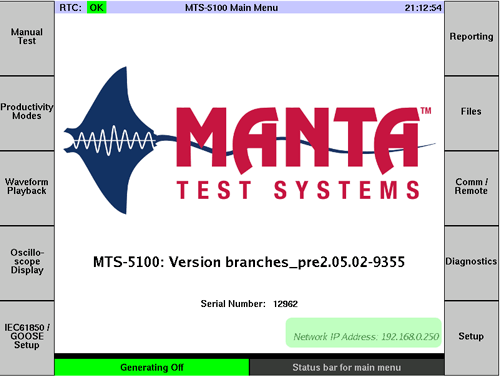
The “Network IP Address” can be found in the bottom right-hand corner of the “MTS-5×00 Main Menu”
You can change your computer to match the Manta address using the steps we described earlier, OR you can change the Manta to match your computer with these steps:
Go to “Command Prompt” as described above and type “Ipconfig” to find out your computer’s default IP address.
Press “Setup” [F10] on the “MTS-5×00 Main Menu”, then “Set up Network” [F5] on the “Setup Menu”
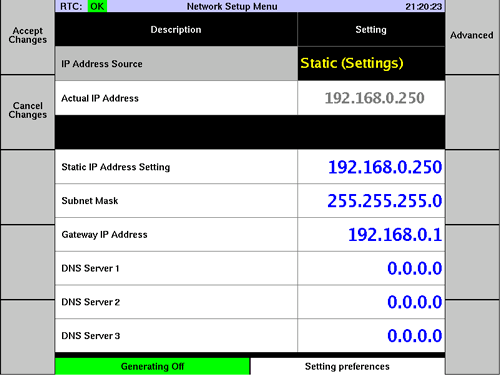
Change the “Static IP Address Setting” and “Subnet Mask” to match your computer. Remember that the last number in the IP Address must be different. The rest of the numbers should stay the same.
Press “Accept Changes” [F1].
Turn the MTS-5×00 off, wait until the fans stop, and turn it back on.
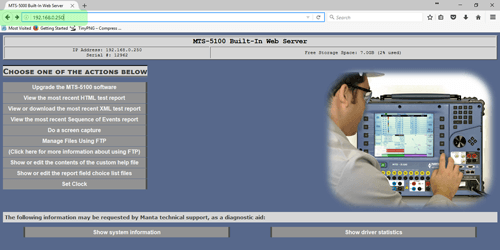
Check the connection by opening any browser (IE, Chrome, Firefox, etc.) and type the IP Address of the Test-set. If you can see the following menu, you are connected and ready to go. This also means that your IT department is letting information back and forth, so there should be no problem communicating with Manta or RTS software.
If you are connecting to a MTS-5000, you may need to slow your network adapter speed down to 10 MPS Half Duplex in the Network and Sharing / Change Adapter Settings / Properties / Configure / Speed & Duplex menu. There should be no speed problems with an MTS-5100.
Tips and Tricks
- Remember that you won’t be able to connect to the internet when you connect to your hotel of office LAN until you change the TCP/IPv4 settings back to “Obtain and IP Address Automatically” and “Obtain DNS Server Address Automatically”.

- You can avoid changing the TCP/IPv4 settings by setting the “Alternate Configuration” to match the test-set as we described earlier. This way, your computer will get an IP Address when you are connected a real network, and default to the Alternate Configuration two or three minutes after connecting to a test-set. This will only work if your IT department allows changes to the alternate configuration. Sometimes they let you change the settings, but the settings are never applied. Use the troubleshooting steps above to see if the alternate configuration works for you.
- If you set all of your test-sets with the same IP address, you can connect to any test-set with the same configuration and save yourself some time and effort.
- You can make any connection wireless with an inexpensive TP-LINK TL-WR702N router. Manta has an excellent description on their website that can be applied to any device
I hope you found this article useful. Let me know in the comments if you want to see another relay, test-set, or software listed in this article.
And if you click below and subscribe, we’ll send you a free quick-reference PDF cheat sheet to go along with this guide that you can take with you on the job site:
Discover more from Valence Electrical Training Services
Subscribe to get the latest posts sent to your email.
Did you like this post?
You can share it with these links:
Read More Articles:
Valence will be at the 34th Annual Hands-On Relay School
I’ve faced the connection issues several times ago but after I read this lesson I didn’t have to reconnect my laptop again and again just follow these steps and it will definitely works for you from the first shoot
Very interesting and useful.
Thanks for the good work.
Thanks for the tip on TCP/IP 4 Alternate Configuration. This will save time hooking up to my Manta.
Thanks for the comment.
I am using ENervista 469 and Enervista 750 to change relay settings to 469 and 750 relays. With both, I can connect to device, read order code and even change the settings one by one but i cannot read device files from any relay! It starts but only gets to 8% then fails. I have tried everything, restarted several time, i know the cable is good because I use it one other relay types. One of my coworkers is having the same issue but several other coworkers are not having the issue. Reinstalled the software but has no affect. What could it be?
It might be the firmware of the relay. You may want to try to the old 750 and 469 software instead.
You could also try to upgrade the firmware through Enervista, but only if you have a spare in case it fails.
Hi, I'm try trying to connect PC rs232 port to the Ge relay 469, but sorry that i'm confussed with the Straight-through connection. PC has male db9 but GE relay has female DB9, but the diagram shows both of teh are female. Please help my confussion.
DB9 just means that there are nine pins. You can buy cables with any combination of male female ends.
Most people add a male gender bender, a female gender bender, and a null modem adapter when they buy their cables so they are ready for any scenario.